2020-08-08
利用邮箱重置密码
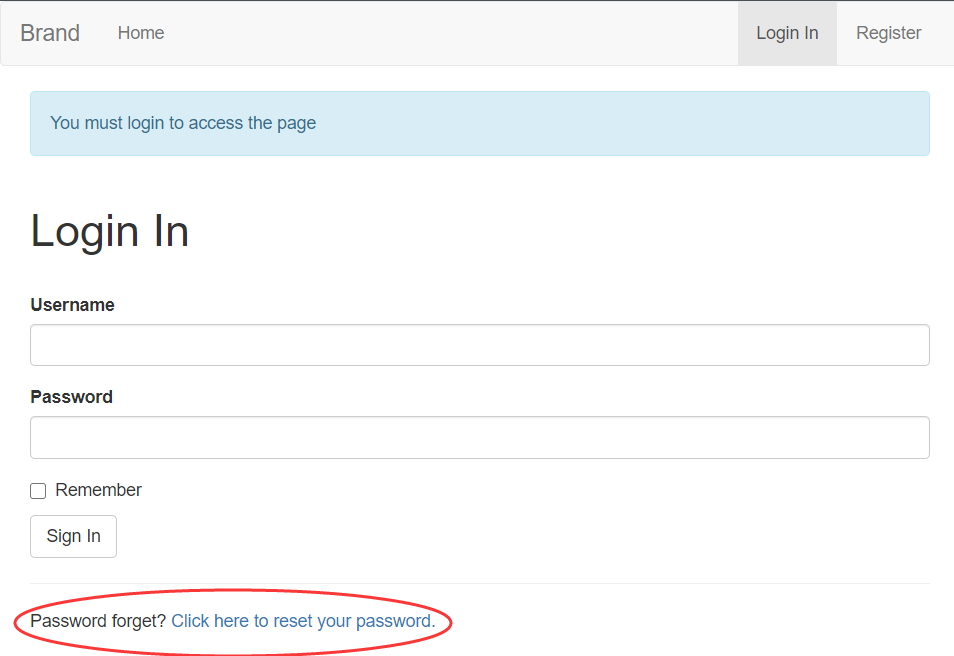
- 在登录界面 (login.html) 创建 “忘记密码,找回选项”
1
2
3
4
5
6
7
8<div class="row">
<div class="col-md-6">
<hr>
{# 创建 找回密码界面 "send_password_reset_request.html" #}
Password forget? <a href="{{ url_for('send_password_reset_request') }}">
Click here to reset your password.</a>
</div>
</div>
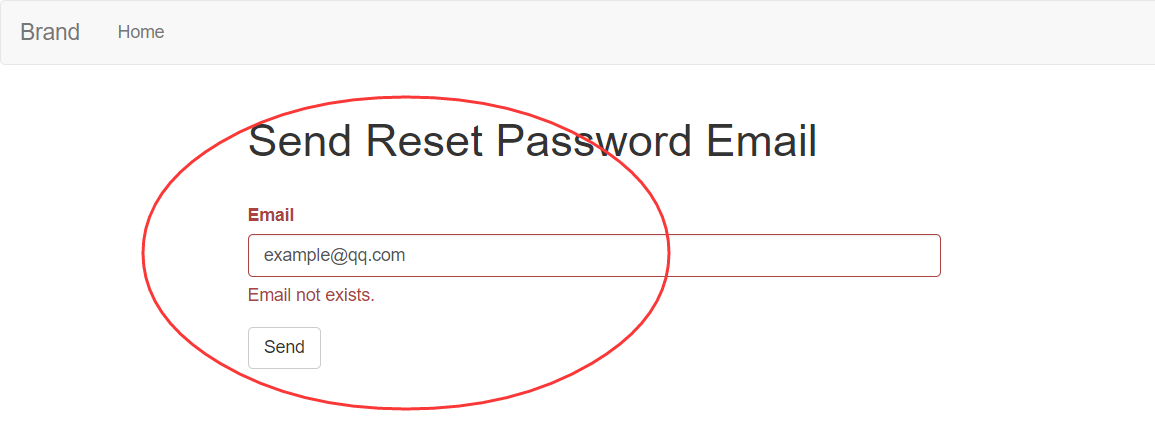
2. 创建 找回密码界面 “send_password_reset_request.html” 界面配置与 注册界面类似
1
2
3
4
5
6
7
8
9
10
11
12
13
14
{% extends 'base.html' %}
{% block app_content %}
# 重置密码标题
<h1>Send Reset Password Email</h1>
<br>
<div class="row">
<div class="col-md-6">
{% import 'bootstrap/wtf.html' as wtf %}
{{ wtf.quick_form(form) }}
</div>
</div>
{% endblock %}
3. 在 forms.py 内创建 重置密码表单,
1
2
3
4
5
6
7
8
9
10
11
12
class PasswordResetRequestForm(FlaskForm):
# 输入 Email 表格
email = StringField('Email', validators=[DataRequired(), Email()])
# 发送邮件按钮
submit = SubmitField('Send')
def validate_email(self, email):
# 获取 Email
email = User.query.filter_by(email=email.data).first()
# 判断 邮箱是否存在 如果不存在 报错
if not email:
raise ValidationError('Email not exists.')
- 在 route.py 页面设置 发用邮件验证界面
1
2
3
4
5
6
7@app.route('/send_password_reset_request', methods=["GET", "POST"])
def send_password_reset_request():
# 判断是否是已经处于登录状态,如果是回到主界面
if current_user.is_authenticated:
return redirect(url_for('index'))
form = PasswordResetRequestForm()
return render_template('send_password_reset_request.html', form=form)
通过加密发送邮件给用户,安全实现密码更改 (PyJWT 加密,flask-mail 发送邮件验证)
1 | pip install PyJWT |
在 model.py 下创建加密规则与解密验证规则
1
2
3
4
5
6
7
8
9
10
11
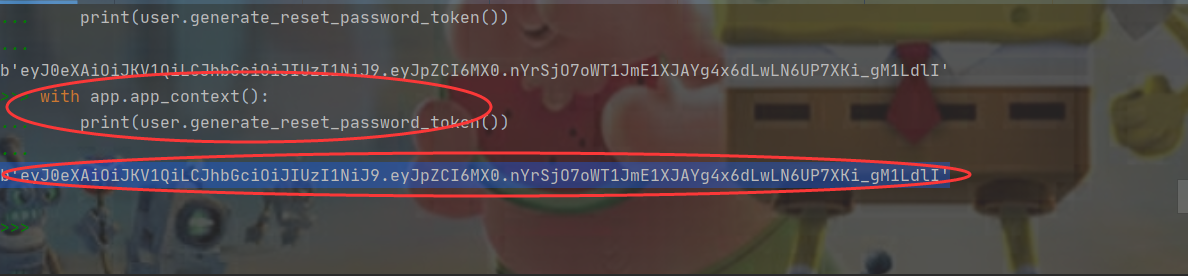
12import jwt
def generate_reset_password_token(self):
# 将 token 与用户名 作为验证信息加密 传输
return jwt.encode({'id': self.id}, current_app.config['SECRET_KEY'], algorithm="HS256")
def check_reset_password_token(self, token):
# 验证是加密的 验证信息 是否正确,是否遭到篡改
try:
data = jwt.decode(token, current_app.config['SECRET_KEY'], algorithm=["HS256"])
return User.query.filter_by(id=data['id']).first()
except:
return在 __init__.py 内部导入 flask-mail
1
2
3
from flask_mail import Mail
# mail 需要很多配置 可以百度 flask mail config
mail = Mail(app)配置 mail 设置 config (在 config.py内配置)
1
2
3
4
5
6
7
8
9
# Flask Gmail Config
# 服务器 也可以用 qq 邮箱 smtp.qq.com (国内最好使用qq邮箱)
MAIL_SERVER = 'smtp.gmail.com'
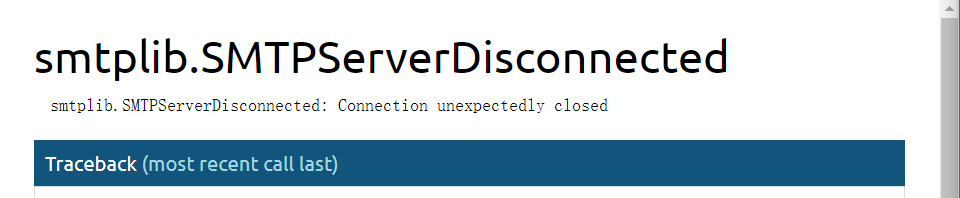
# 端口 (不要使用默认端口 465 ,使用其他端口 25 或者其他的,否则会报错 smtplib.SMTPServerDisconnected: Connection unexpectedly closed)
MAIL_PORT = 25
MAIL_USER_SSL = True
# 将 MAIL_USERNAME/qq 写入环境变量,放入自己的 GMAIL/qq 账号与 令牌 (GMAIL_PASSWORD,需要填入令牌)
MAIL_USERNAME = os.environ.get('GMAIL_USERNAME') or 'GMAIL_USERNAME'
MAIL_PASSWORD = os.environ.get('GMAIL_PASSWORD') or 'GMAIL_PASSWORD'新建 email.py 页面 定义发送邮件
1
2
3
4
5
6
7
8
9
10
11
12
13
from flask import current_app, render_template
from flask_mail import Message
from app import mail
def send_reset_password_mail(user, token):
msg = Message("[Flask App] Reset Your Password!",
# 发送者邮箱,在 config.py 内定义的 邮箱
sender=current_app.config["MAIL_USERNAME"],
# 接受者邮箱
recipients=[user.email],
html=render_template('reset_password_mail.html',user=user, token=token))
mail.send(message=msg)在 route.py 内配置重设密码页面以及补全发送邮箱验证界面
1
2
3
4
5
6
7
8
9
10
11
12
13
14
15
16
17
18
19
20
21
22
23
24
25
26
def send_password_reset_request():
if current_user.is_authenticated:
return redirect(url_for('index'))
form = PasswordResetRequestForm()
# 获取提交上来的注册数据,进行处理
if form.validate_on_submit():
email = form.email.data
user = User.query.filter_by(email=email).first()
# token 作为参数加密放入链接发送给用户
token = user.generate_reset_password_token()
# 创建 email.py 发送给用户 加密 token
send_reset_password_mail(user, token)
# 建立 flash 提醒用户发送重设密码邮件成功
flash('Password reset requests mail is send, please check your mail.', category='info')
return render_template('send_password_reset_request.html', form=form)
@app.route('/reset_password', methods=["GET", "POST"])
# 重设密码界面
def reset_password():
# 判断用户登录状态
if current_user.is_authenticated:
return redirect(url_for('index'))
form = ResetPasswordForm()
# 根据表单渲染 reset_password.html 页面
return render_template('reset_password.html', form=form)创建发送给用户的 重设密码邮件 界面 “reset_password_mail.html”
1
2
3
4
5
6
7
8
9
10
11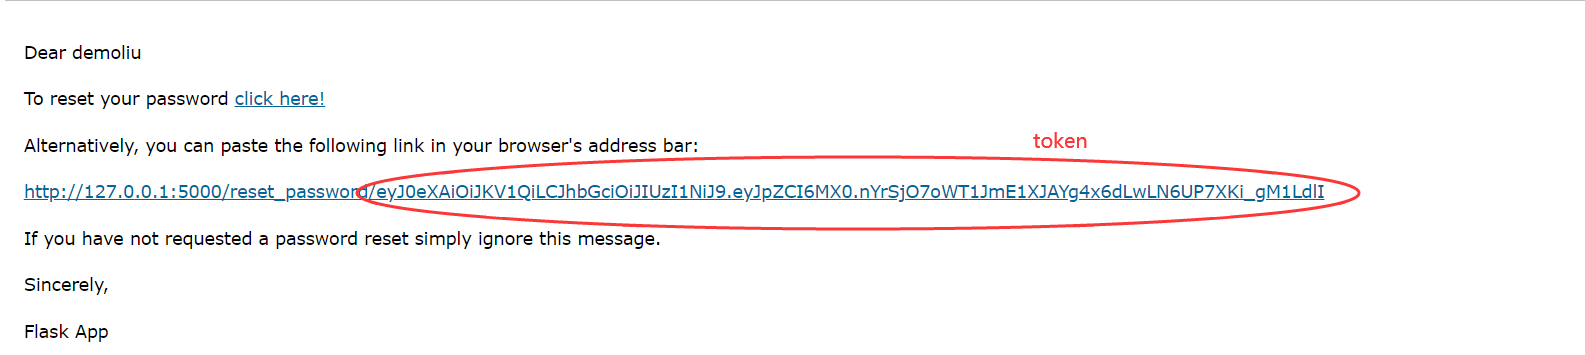
12<p>Dear {{ user.username }}</p>
<p>
To reset your password
<a href="{{ url_for('reset_password', token=token, _external=True) }}">
click here!
</a>
</p>
<p>Alternatively, you can paste the following link in your browser's address bar:</p>
<p>{{ url_for('reset_password', token=token, _external=True) }}</p>
<p>If you have not requested a password reset simply ignore this message.</p>
<p>Sincerely,</p>
<p>Flask App</p>创建重置密码页面 (reset_password.html) 与注册页面类似
1
2
3
4
5
6
7
8
9
10
11
12
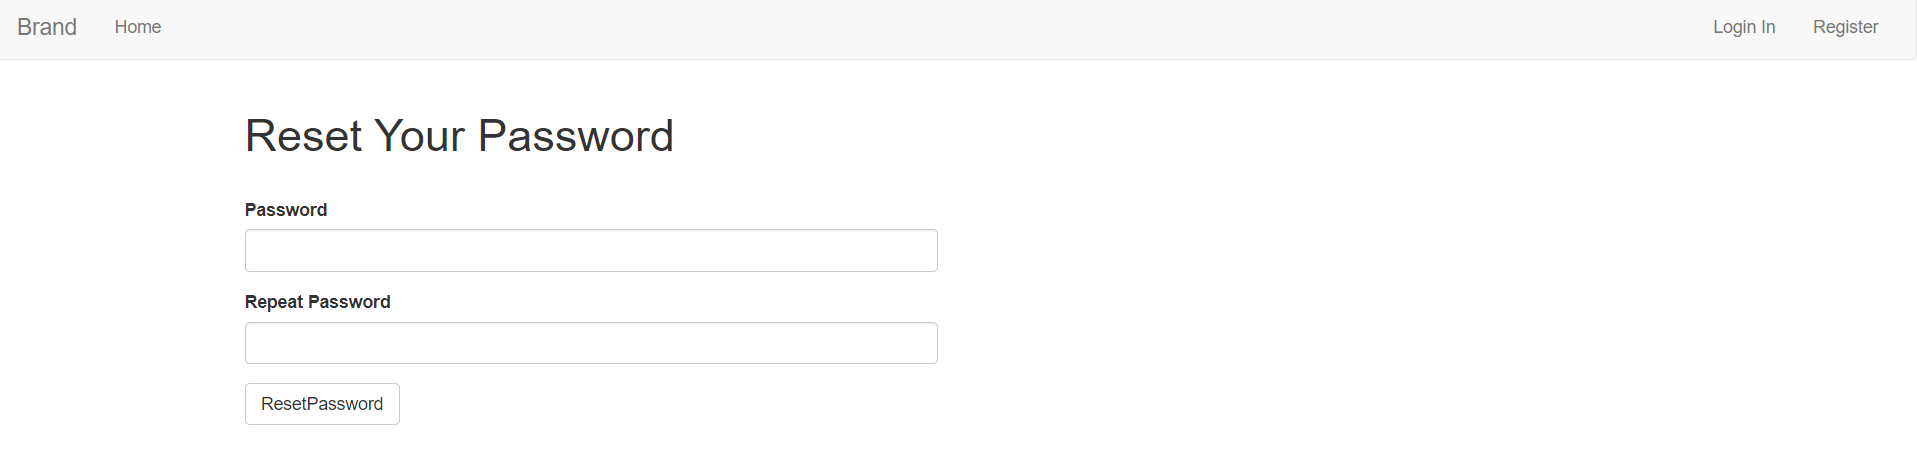
13{% extends 'base.html' %}l>
{% block app_content %}
<h1>Reset Your Password</h1>
<br>
<div class="row">
<div class="col-md-6">
{% import 'bootstrap/wtf.html' as wtf %}
{{ wtf.quick_form(form) }}
</div>
</div>
{% endblock %}完善 更改用户密码功能 。(route.py)
1
2
3
4
5
6
7
8
9
10
11
12
13
14
15
16
17
18
19
20
# 将 '/reset_password' 改为 '/reset_password/<token>' 获取传递过去的 token
@app.route('/reset_password/<token>', methods=["GET", "POST"])
def reset_password(token):
if current_user.is_authenticated:
return redirect(url_for('index'))
form = ResetPasswordForm()
# 获取表单数据
if form.validate_on_submit():
# 解密 token 获得用户名
user = User.check_reset_password_token(token=token)
# 如果用户存在
if user:
# 获取用户新更改的密码,传入数据库进行更新操作
user.password = bcrypt.generate_password_hash(form.password.data)
db.session.commit()
flash('Your Password reset is done, You can login now use new Password.', category='info')
else:
flash("The user is not exist", category='info')
return redirect(url_for('login'))
return render_template('reset_password.html', form=form)为了方便,将 models.py 中的 验证密码改为 返回函数的静态方法,不需要实例化直接传参使用
1
2
3
4
5
6
7
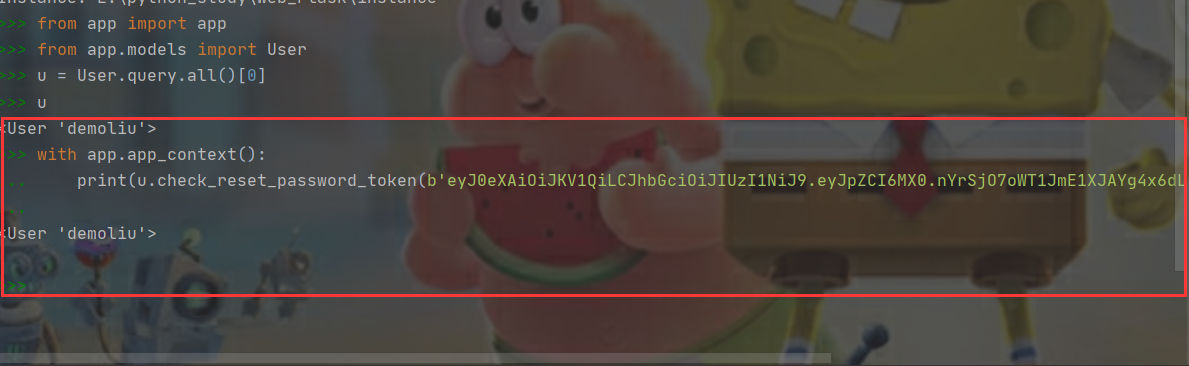
8@staticmethod
def check_reset_password_token(token):
# 验证是加密的 验证信息 是否正确,是否遭到篡改
try:
data = jwt.decode(token, current_app.config['SECRET_KEY'], algorithm=["HS256"])
return User.query.filter_by(id=data['id']).first()
except:
return优化: 运用线程对发送邮件进行加速,使发送在后端进行,前端快速返回 (修改 email.py)
1
2
3
4
5
6
7
8
9
10
11
12
13
14
15
16
17
18
19
20from threading import Thread
from flask import current_app, render_template
from flask_mail import Message
from app import mail, app
def send_async_mail(app, msg):
with app.app_context():
mail.send(msg)
def send_reset_password_mail(user, token):
msg = Message("[Flask App] Reset Your Password!",
sender=current_app.config["MAIL_USERNAME"],
recipients=[user.email],
html=render_template('reset_password_mail.html',user=user, token=token))
# print(user.email, current_app.config["MAIL_USERNAME"])
# mail.send(message=msg)
# 调用线程在后端进行发送,前端快速进行页面更改
Thread(target=send_async_mail, args=(app, msg, )).start()
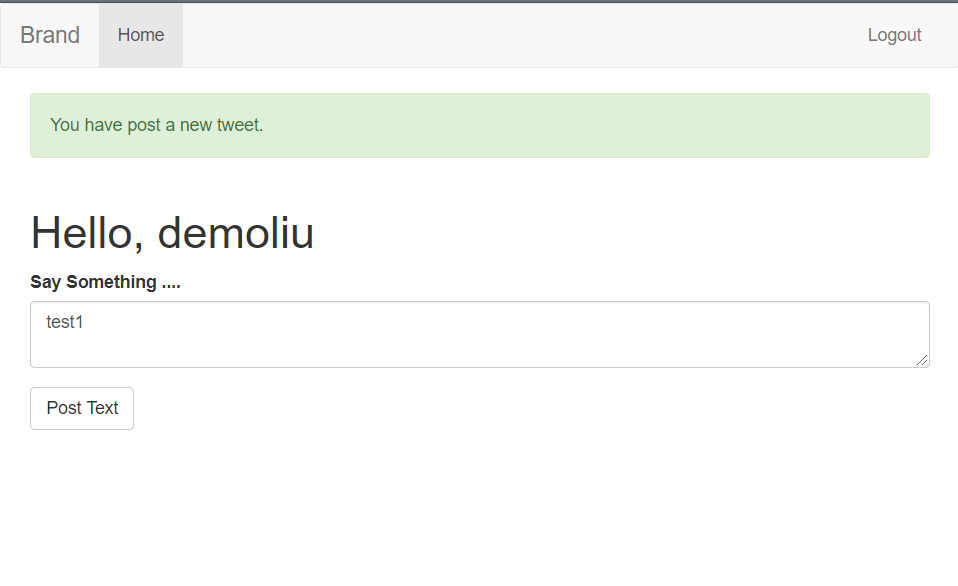
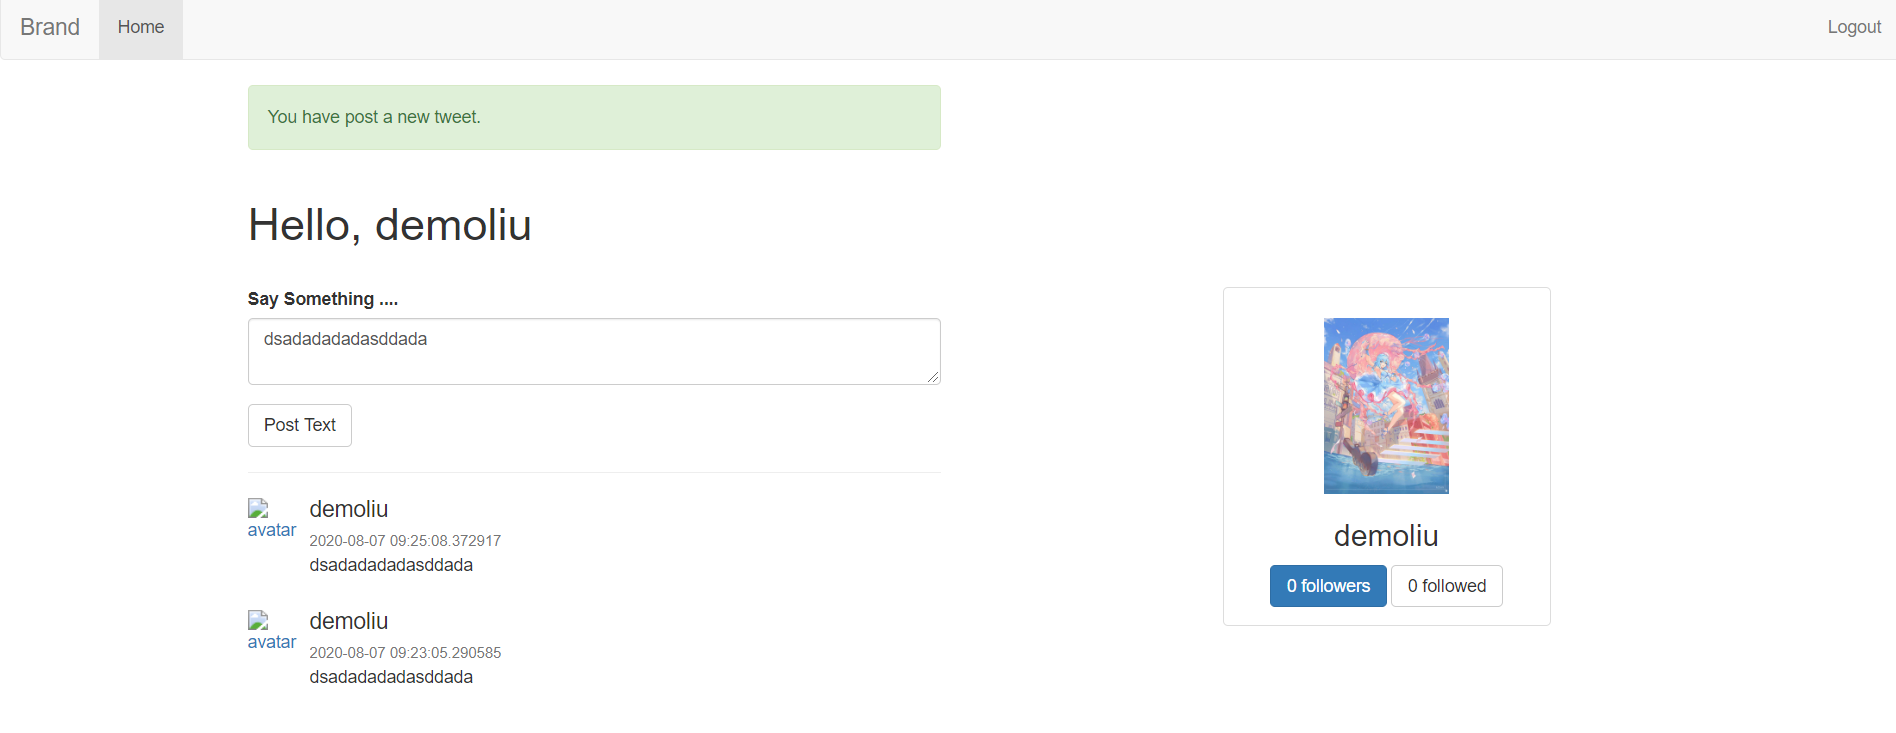
对 index 主页进行修改,实现一对多表格 (一个用户发送多个 Post Tweet)
修改 index.html,引入 form 表格
1
2
3
4
5
6
7
8
9
10
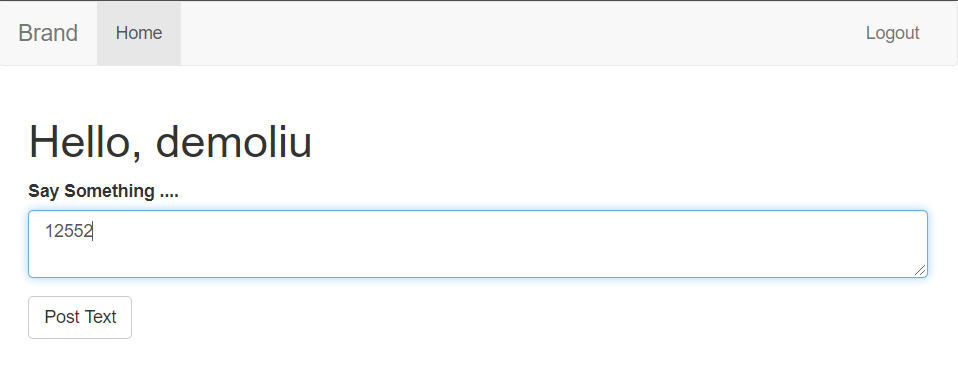
11{% extends "base.html" %}
{% block app_content %}
<h1>Hello, {{ current_user.username }}</h1>
<div class="row">
<div class="col-md-6">
{% import 'bootstrap/wtf.html' as wtf %}
{{ wtf.quick_form(form) }}
</div>
</div>
{% endblock %}在 form.py 内增加 表单数据
1
2
3
4
5from wtforms import StringField, PasswordField, SubmitField, BooleanField, TextAreaField
class PortTweetForm(FlaskForm):
# 文本框
text = TextAreaField('Say Something ....', validators=[DataRequired(), Length(min=1, max=40)])
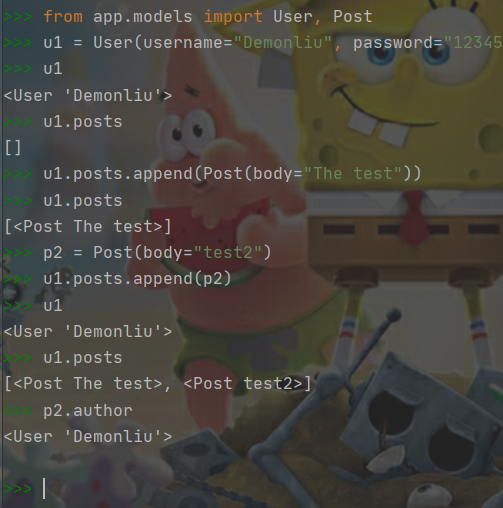
submit = SubmitField('Post Text')删除旧的 app.db ,在 model.py 内 新建 Post 类用于存储发布的文本,并与 User 类中的数据库链接
1
2
3
4
5
6
7
8
9
10
11
12
13
14
15
16
17from datetime import datetime
class User(db.Model, UserMixin):
...
# 第一个 'Post' 对于 class Post ; backref 返回的信息;'author' 数据库中存储 Post 进入数据的名称; lazy=True 如果不用就不连接
posts = db.relationship('Post', backref=db.backref('author', lazy=True))
...
class Post(db.Model):
id = db.Column(db.Integer, primary_key=True)
body = db.Column(db.String(140), nullable=False)
# 显示发布时间
timestamp = db.Column(db.DateTime, default=datetime.utcnow)
# 连接数据库中得到 user.id
user_id = db.Column(db.Integer, db.ForeignKey('user.id'), nullable=False)
def __repr__(self):
return '<Post {}>'.format(self.body)在 route.py 内 对 index 页面进行构造
1
2
3
4
5
6
7
8
9
10
11
12
13
14from app.models import User, Post
@app.route('/', methods=['GET', 'POST']) # 指定路由
# 需要登录
@login_required
def index():
form = PortTweetForm()
if form.validate_on_submit():
body = form.text.data
# 将 post 发送到数据库
post = Post(body=body)
current_user.posts.append(post)
db.session.commit()
flash('You have post a new tweet.', category='success')
return render_template('index.html', form=form)
数据库的多对多关系 (用户关注与取关)
- 先定义 数据库中的 关注/取关 与 User 联系 (models.py)
1
2
3
4
5
6
7
8
9
10
11
12
13
14
15
16
17
18
19
20
21
22
23
24
25
26
27
28
29
30
31
32
33
34
35
36
37
38
39
40
41
42
43
44
45
46
47
48
49
50
51
52
53
54
55# 简单的示范性的 关注关系 (只包含关注者与被关注着),复杂的需要建立 class
followers = db.Table("followers",
db.Column("follower_id", db.Integer, db.ForeignKey('user.id')),
db.Column("followed_id", db.Integer, db.ForeignKey('user.id'))
)
class User(db.Model, UserMixin):
# nullable 非空 ; unique 不能重复
id = db.Column(db.Integer, primary_key=True)
username = db.Column(db.String(20), unique=True, nullable=False)
password = db.Column(db.String(20), nullable=False)
email = db.Column(db.String(120), unique=True, nullable=False)
# 第一个 'Post' 对于 class Post ; backref 返回的信息;'author' 数据库中存储 Post 进入数据的名称; lazy=True 如果不用就不连接
posts = db.relationship('Post', backref=db.backref('author', lazy=True))
# 'User': 关注者与被关注着链接是用户之间的连接; primaryjoin=(followers.c.follower_id==id) 左边的关注着与右边的关注者通过 id 相互连接
# 先正向连接,然后 backref 反向链接
followed = db.relationship(
'User', secondary=followers,
primaryjoin=(followers.c.follower_id == id),
secondaryjoin=(followers.c.followed_id == id),
backref=db.backref('followers', lazy=True), lazy=True
)
def __repr__(self):
return '<User %r>' % self.username
def generate_reset_password_token(self):
# 将 token 与用户名 作为验证信息加密 传输
return jwt.encode({'id': self.id}, current_app.config['SECRET_KEY'], algorithm="HS256")
 @staticmethod
 def check_reset_password_token(token):
 # 验证是加密的 验证信息 是否正确,是否遭到篡改
 try:
      data = jwt.decode(token, current_app.config['SECRET_KEY'], algorithm=["HS256"])
	return User.query.filter_by(id=data['id']).first()
except:
	return
# 定义关注
def follow(self, user):
if not self.is_following(user):
self.followed.append(user)
# 定义取关
def unfollow(self, user):
if self.is_following(user):
self.followed.remove(user)
# 判断是否关注
def is_following(self, user):
# 从 followed 找到当前已经关注的,如果 >0 则已经关注
return self.followed.count(user) > 0 - 对主页 index.html 进行修改
1
2
3
4
5
6
7
8
9
10
11
12
13<div class="align-right">
<div class="thumbnail text-center">
<br>
<img src="{{ current_user.avatar_img }}" alt="avatar" width="100px" >
<div class="caption">
<h3>{{ current_user.username }}</h3>
<p>
<a href="#" class="btn btn-primary" role="button">{{ n_followers }} followers</a>
<a href="#" class="btn btn-default" role="button">{{ n_followed }} followed</a>
</p>
</div>
</div>
</div> - 在 models.py User 数据库中加入默认头像
1
2
3
4class User(db.Model, UserMixin):
...
avatar_img = db.Column(db.String(120), default='./static/asset/test.jpg', nullable=False)
... - 在 route.py 中定义 index.html 中的 followers 与 followed
1
2
3
4
5
6
7
8@app.route('/', methods=['GET', 'POST']) # 指定路由
# 需要登录
@login_required
def index():
...
n_followers = len(current_user.followers)
n_followed = len(current_user.followed)
return render_template('index.html', form=form, n_followers=n_followers, n_followed=n_followed)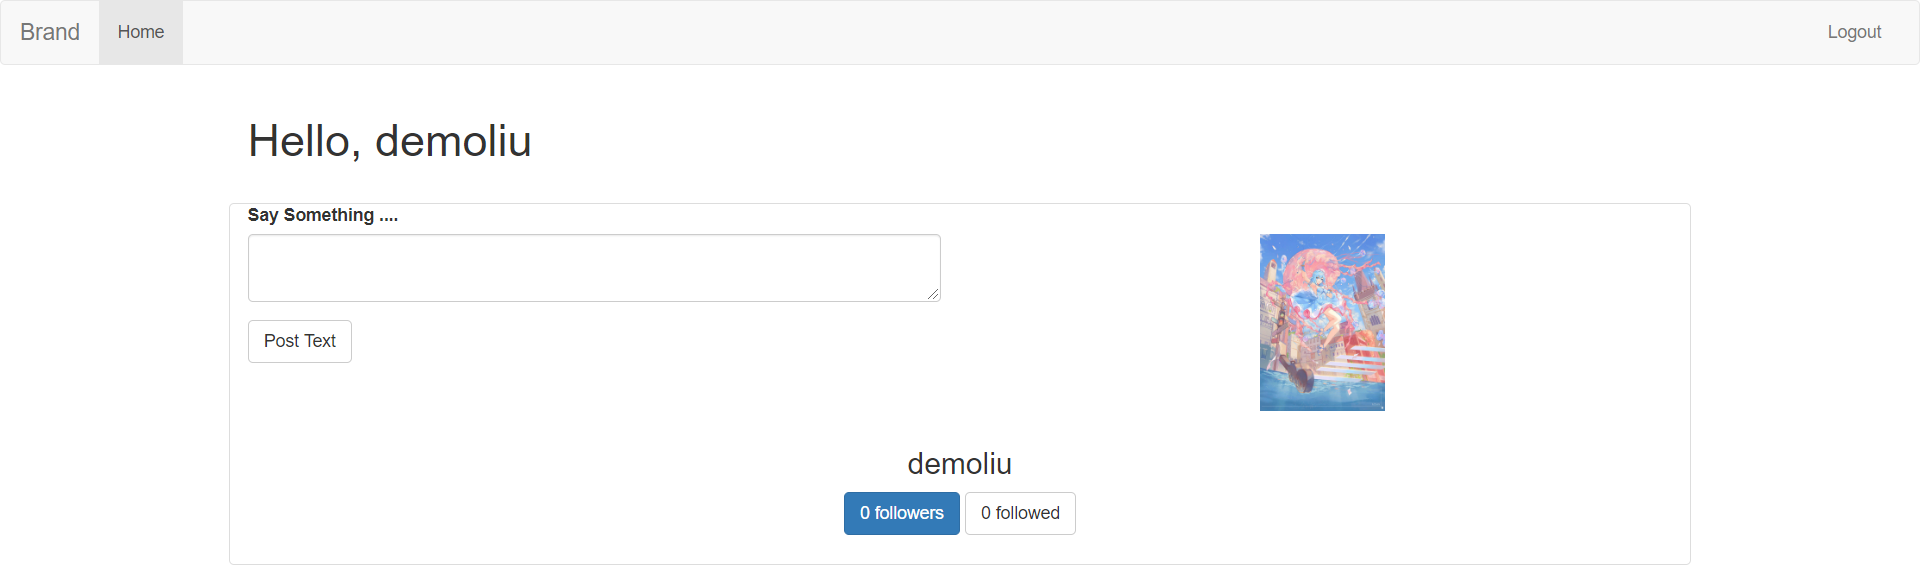
在主页显示用户的发帖 (使用 bootstrap 的 Media heading)
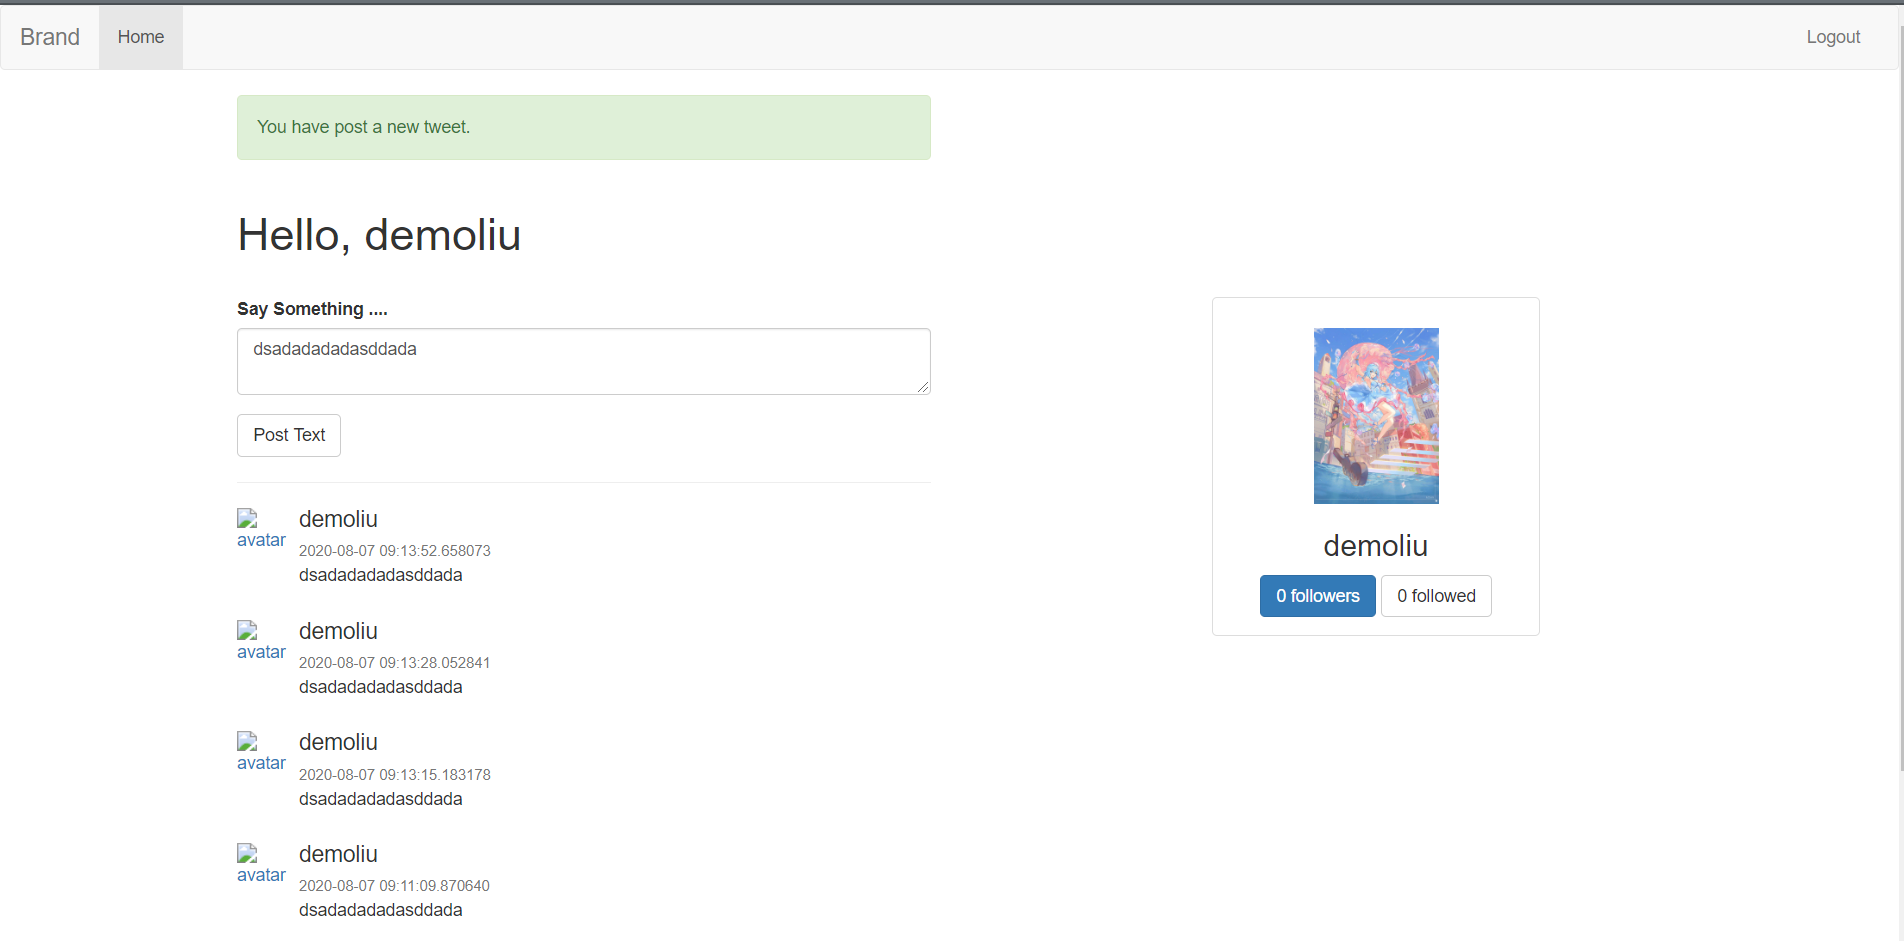
- 在 index.html 中设置 Media heading 模块
1
2
3
4
5
6
7
8
9
10
11
12
13
14
15{% for post in posts %}
<div class="media">
<div class="media-left">
<a href="#">
# 头像
<img src="{{ post.author,avatar_img }}" alt="avatar" width="64px">
</a>
</div>
<div class="media-body">
<h4 class="media-heading">{{ post.author.username }}</h4>
<small class="text-muted">{{ post.timestamp }}</small>
<p>{{ post.body }}</p>
</div>
</div>
{% endfor %} - 在 route.py 中设置将 以倒序排列的 推文传入 index
1
2# 取得 发布的内容 以时间倒序来排列显示
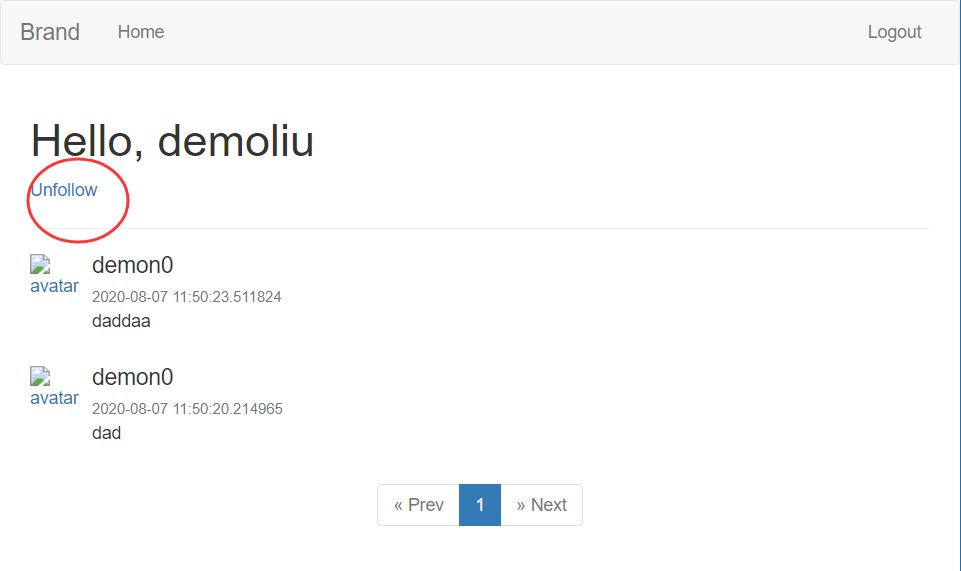
posts = Post.query.order_by(Post.timestamp.desc()).all()分页操作 (主要在 index.html 内进行修改判断,在 route.py 内稍微修改)
- route.py 定义 posts 便于 index.html 调用
1
2
3
4
5# 取得 发布的内容 以时间倒序来排列显示
page = request.args.get('page', 1, type=int)
# paginate(page, 2, False): 返回页数,每页两个推文,默认超出后不会报错
posts = Post.query.order_by(Post.timestamp.desc()).paginate(page, 2, False)
return render_template('index.html', form=form, posts=posts, n_followers=n_followers, n_followed=n_followed) - index.html 内定义 页面页数的变换 (Flask request 库的学习)
1
2
3
4
5
6
7
8
9
10
11
12
13
14
15
16
17
18
19
20
21
22
23
24
25
26
27<nav aria-label="Page navigation">
<center>
<ul class="pagination">
# 添加判断
<li class="{% if not posts.has_prev %}disabled{% endif %}">
<a href="{{ url_for('index', page=posts.prev_num) }}" aria-label="Previous">
<span aria-hidden="true">« Prev</span>
</a>
</li>
{# posts.iter_page() 以当前页为中心显示左右页数 #}
{% for i in posts.iter_pages(right_current=3) %}
{% if i %}
{# 判断是当前页面然后颜色不同 为 active 样式 #}
<li class="{% if i == posts.page %}active{% endif %}"><a href="{{ url_for("index", page=i) }}">{{ i }}</a> </li>
{% else %}
<li class="disabled"><a href="#">...</a> </li>
{% endif %}
{% endfor %}
<li class="{% if not posts.has_next %}disabled{% endif %}">
<a href="{{ url_for('index', page=posts.next_num) }}" aria-label="Next">
<span aria-hidden="true">» Next</span>
</a>
</li>
</ul>
</center>
</nav>
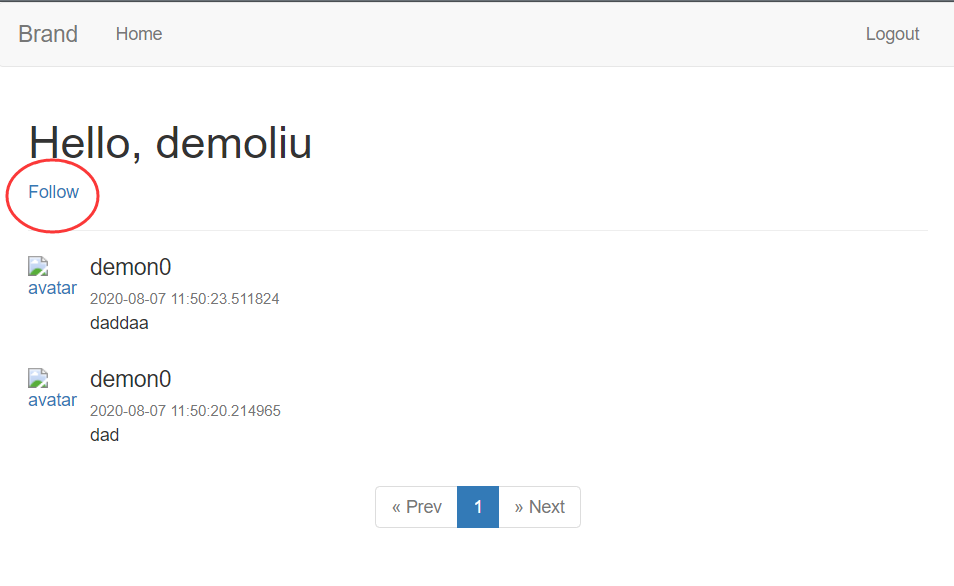
编辑用户个人界面和关注取关操作
- 由于考虑到用户界面可能与主界面有 图片等部分重叠,从 index.html 内截取 Post 部分放入新建的 post_content.html 内,在 index.html 内引用
1
2
3
4
5
6
7
8
9
10
11
12
13
14
15
16
17
18
19
20
21
22
23
24
25
26
27
28
29
30
31
32
33
34
35
36
37
38
39
40
41
42{# 运用函数后返回的不是列表,需要 .Item 转换为列表 #}
{% for post in posts.items %}
<div class="media">
<div class="media-left">
<a href="{{ url_for('user_page', username=post.author.username) }}">
<img src="{{ post.author.avatar_img }}" alt="avatar" width="64px">
</a>
</div>
<div class="media-body">
<h4 class="media-heading">{{ post.author.username }}</h4>
<small class="text-muted">{{ post.timestamp }}</small>
<p>{{ post.body }}</p>
</div>
</div>
{% endfor %}
{# 页面跳转#}
<nav aria-label="Page navigation">
<center>
<ul class="pagination">
<li class="{% if not posts.has_prev %}disabled{% endif %}">
<a href="{{ url_for('index', page=posts.prev_num) }}" aria-label="Previous">
<span aria-hidden="true">« Prev</span>
</a>
</li>
{# posts.iter_page() 以当前页为中心显示左右页数 #}
{% for i in posts.iter_pages(right_current=3) %}
{% if i %}
{# 判断是当前页面然后颜色不同 为 active 样式 #}
<li class="{% if i == posts.page %}active{% endif %}"><a href="{{ url_for("index", page=i) }}">{{ i }}</a> </li>
{% else %}
<li class="disabled"><a href="#">...</a> </li>
{% endif %}
{% endfor %}
<li class="{% if not posts.has_next %}disabled{% endif %}">
<a href="{{ url_for('index', page=posts.next_num) }}" aria-label="Next">
<span aria-hidden="true">» Next</span>
</a>
</li>
</ul>
</center>
</nav> - 在 route.py 内建立 个人信息,关注与取关 页面,并赋予功能
1
2
3
4
5
6
7
8
9
10
11
12
13
14
15
16
17
18
19
20
21
22
23
24
25
26
27
28
29
30
31
32
33
34
35
36@app.route('/user_page/<username>')
@login_required
def user_page(username):
user = User.query.filter_by(username=username).first()
if user:
page = request.args.get('page', 1, type=int)
posts = Post.query.filter_by(user_id=user.id).order_by(Post.timestamp.desc()).paginate(page, 2, False)
return render_template('user_page.html', user=user, posts=posts)
else:
return '404'
@app.route('/follow/<username>', methods=['GET', 'POST'])
@login_required
def follow(username):
user = User.query.filter_by(username=username).first()
if user:
current_user.follow(user)
db.session.commit()
page = request.args.get('page', 1, type=int)
posts = Post.query.filter_by(user_id=user.id).order_by(Post.timestamp.desc()).paginate(page, 2, False)
return render_template('user_page.html', user=user, posts=posts)
else:
return '404'
@app.route('/unfollow/<username>', methods=['GET', 'POST'])
@login_required
def unfollow(username):
user = User.query.filter_by(username=username).first()
if user:
current_user.unfollow(user)
db.session.commit()
page = request.args.get('page', 1, type=int)
posts = Post.query.filter_by(user_id=user.id).order_by(Post.timestamp.desc()).paginate(page, 2, False)
return render_template('user_page.html', user=user, posts=posts)
else:
return '404' - 建立个人信息界面 user_page.html
1
2
3
4
5
6
7
8
9
10
11
12
13
14
15
16
17
18
19
20
21{% extends 'base.html' %}
{% block app_content %}
<div class="row">
<div class="col-md-6">
<h1>Hello, {{ current_user.username }}</h1>
# 如果是用户正在观看自己的 个人信息,增加 填写信息 按钮
{% if current_user == user %}
<a href="#">Edit Profile</a>
# 如果用户正在看其他人的页面,添加 关注与取关 按钮
{% else %}
{% if current_user.is_following(user) %}
<a href="{{ url_for("unfollow", username=user.username) }}">Unfollow</a>
{% else %}
<a href="{{ url_for("follow", username=user.username) }}">Follow</a>
{% endif %}
{% endif %}
<hr>
{% include "post_content.html" %}
</div>
</div>
{% endblock %}
Flask 上传文件 (用来修改头像)
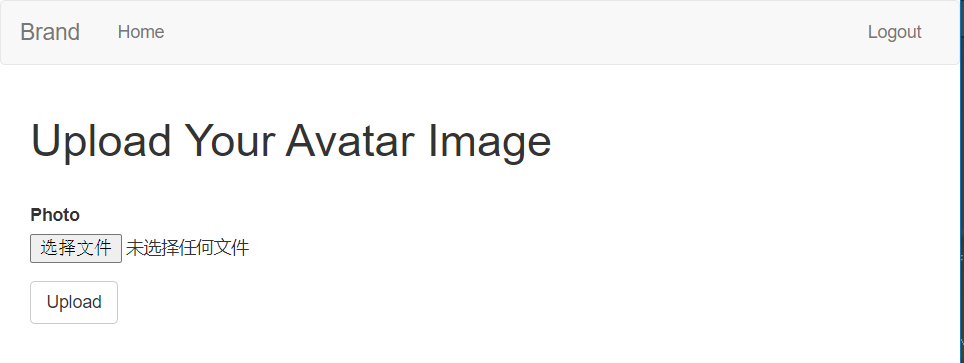
- 编写 上传文件 页面 edit_profile.html
1
2
3
4
5
6
7
8
9
10
11
12
13{% extends 'base.html' %}
{% block app_content %}
<h1>Upload Your Avatar Image</h1>
<br>
<div class="row">
<div class="col-md-6">
{% import 'bootstrap/wtf.html' as wtf %}
{{ wtf.quick_form(form) }}
</div>
</div>
{% endblock %} - 建立 上传表单
1
2
3
4
5# 上传文件使用 库
from flask_wtf.file import FileField, FileRequired
class UploadPhotoForm(FlaskForm):
photo =FileField(validators=[FileRequired()])
submit = SubmitField('Upload') - 在用户信息界面将 Edit Profile 链接到 上传页面
1
<a href="{{ url_for("edit_profile") }}">Edit Profile</a>
- 在 route.py 完善 上传页面配置
1
2
3
4
5
6
7
8
9
10
11
12
13
14
15
16
17
18
19
20
21
22
23import os
from werkzeug.utils import secure_filename
@app.route('/edit_profile', methods=['GET', 'POST'])
def edit_profile():
form = UploadPhotoForm()
if form.validate_on_submit():
f = form.photo.data
# secure_filename 对用户上传的 软件名 进行再次包装,防止入侵
filename = secure_filename(f.filename)
if f.filename == "":
flash("No selected file", category="danger")
return render_template("edit_profile.html", form=form)
# 如果文件名是允许的后缀,可以进行操作
if f and allowed_file(f.filename):
# secure_filename 对用户上传的 软件名 进行再次包装,防止入侵
filename = secure_filename(f.filename)
# 定义上传图片保存位置
f.save(os.path.join('app', 'static', 'asset', filename))
# 将数据库中默认的头像转变为用户自定义头像
current_user.avatar_img = "/static/asset/" + filename
db.session.commit()
return redirect(url_for("user_page", username=current_user.username))
return render_template("edit_profile.html", form=form)